APEX EcoBuilt
Leading Manufacturer of Aluminum Systems & Modular Housing
APEX EcoBuilt
Leading Manufacturer of Aluminum Systems & Modular Housing

 12 May, 2026Knowledges
Curtain wall water leakage almost never starts on the job site — it starts in the design package, where missed pressure equalization, undersized weep paths, and sealant-only joints quietly guarantee future failure. The fastest way to catch these flaws is a pre-installation review of the shop drawings against three things: the water management strategy, the thermal movement budget, and a mock-up test plan tied to ASTM E331 or AAMA 501.2. Get those right and 90% of facade leaks disappear before the first panel ships.
Water rarely defeats curtain walls through brute force. It exploits pressure differentials. When wind hits a building, it creates positive pressure on the windward face and negative pressure elsewhere — and that pressure differential drives water through any unsealed gap, capillary path, or unbalanced joint.
This is why a system that passes a static water test at 720 Pa can still leak at 300 Pa in real weather. The lab test misses the dynamic pressure cycling that real storms produce.
Most leaks trace back to four root causes:
If you can audit the shop drawings against these four failure modes, you’ve already eliminated the majority of warranty claims before they happen.

The single most consequential decision in curtain wall design is also the one most often skipped: which water management philosophy are you using? Face-sealed systems rely on a continuous outer seal — one defect, one leak. Pressure-equalized rainscreens accept that some water will pass the outer line, and they drain it back out through a vented cavity.
For anything taller than three stories or in driving-rain climates, pressure-equalized is the only defensible choice. Yet we still see designs that quietly default to face-sealed because the detailer copied an old template.
A simple check: open the shop drawings to a typical horizontal stack joint. Is there a vented baffle, a sloped sill flashing, and a clear drainage path to an external weep? If any of those three are missing, you have a face-sealed system regardless of what the spec calls it.
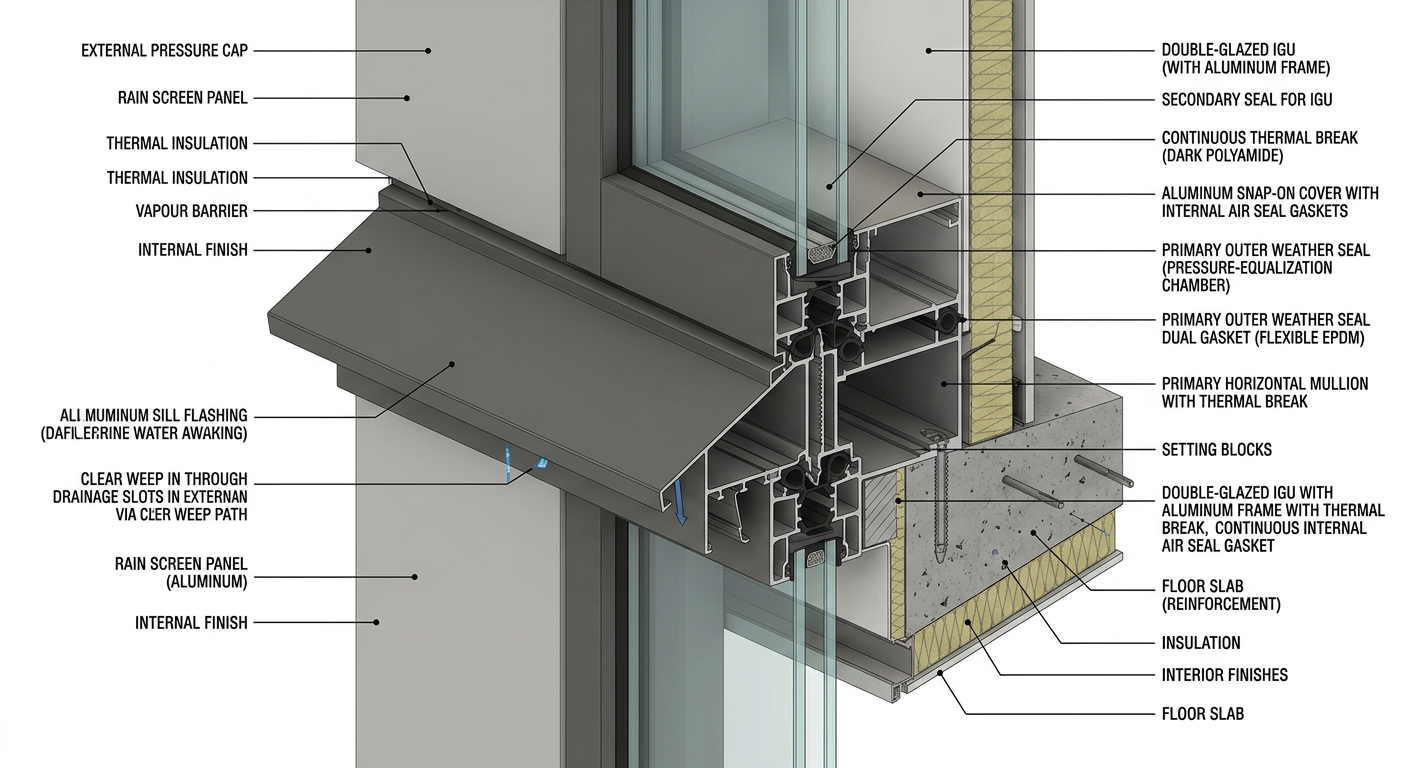
Before any aluminum is extruded, sit down with the shop drawings and a red pen. Here’s what to flag:
This four-way junction is where 60% of unitized curtain wall leaks originate. There should be two independent gaskets — an inner air seal and an outer weather seal — with a drained cavity between.
A 3mm weep slot looks fine on paper but clogs within two years from dust and insect debris. Specify 6–8mm slots or circular weeps at every mullion.
If the drawing shows a flat sill pan, ask for a revision. Minimum 5° outward slope, with upturned ends to form a dam.
A 30m mullion run will move 18–22mm with seasonal temperature swing. If the splice detail doesn’t show a sliding sleeve with a continuous gasket, your sealant joint will tear within three winters.
The curtain wall air seal must connect physically to the building’s air barrier — not just “lap onto” it. Look for a labeled transition membrane in the section detail.
For more on how unitized systems compare on these points, our guide on speccing curtain walls for harsh climates covers the gasket and thermal-break interactions in depth.
Aluminum expands roughly 2.4mm per meter per 100°C. On a south-facing facade in the Middle East, a single 4m panel can see surface temperatures swing from 5°C at dawn to 75°C by noon. That’s a 7mm cyclic movement, every day, for the next 30 years.
If the joint design doesn’t accommodate that movement with a sliding splice or properly sized sealant bead (depth-to-width ratio of 1:2, never 1:1), the seal will work-harden and crack. Once cracked, water tracks behind the gasket and into the building.
For example, a hotel developer in Dubai retrofitted 400 units after persistent leaks on the western elevation. Root cause: the original detailer used a fixed mullion splice instead of a slip joint, and the spandrel sealant joints were 8mm wide × 8mm deep — exactly the wrong geometry. Catching this in design review would have cost an hour. The retrofit cost $2.3M.
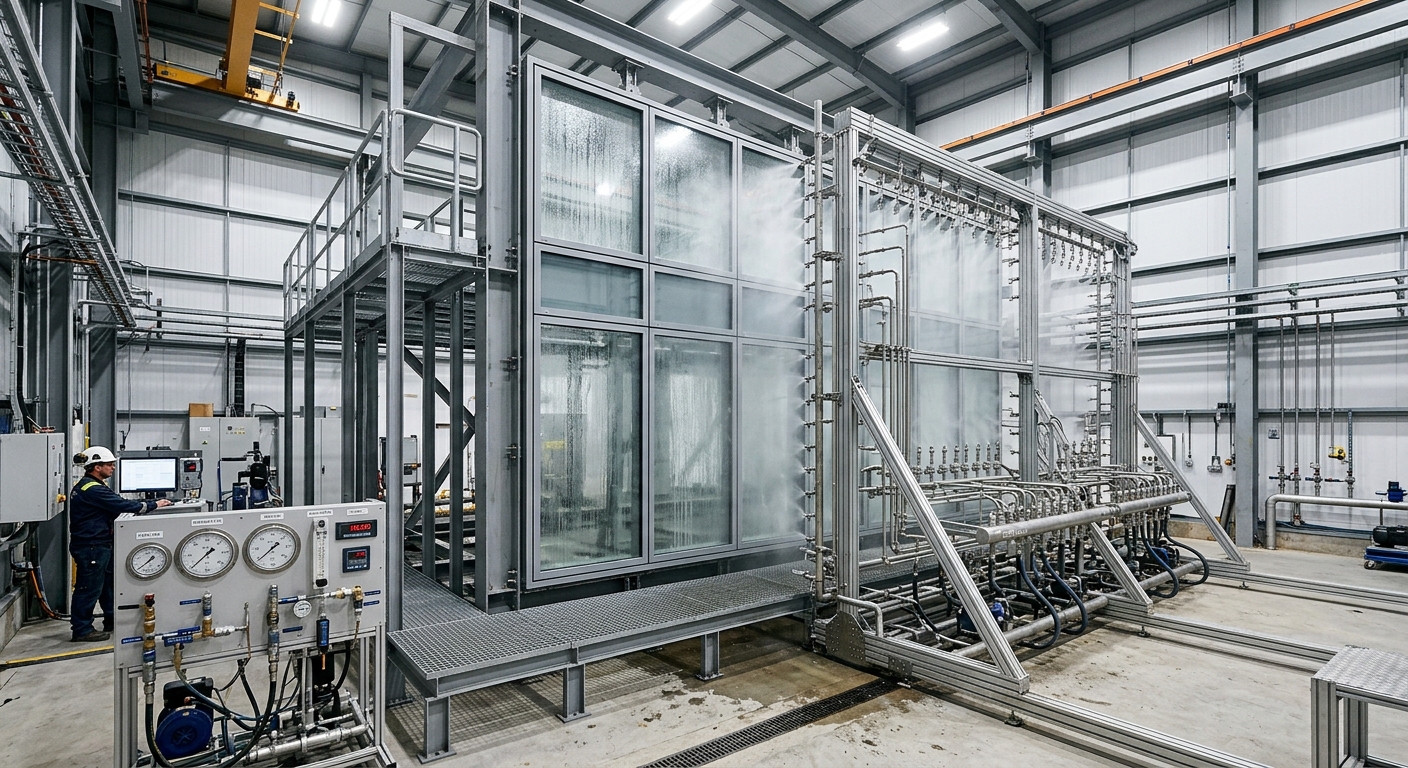
A full-scale visual mock-up tested to AAMA 501 standards typically costs $30,000–$60,000 depending on size. That sounds expensive until you compare it to the cost of a leaking facade on a finished building.
The tests that actually matter:
The dynamic test (501.1) is the one that catches pressure-equalization failures the static test misses. If your supplier resists running it, that’s a red flag — they probably know the system won’t pass.
Ask for the witness test report, with date-stamped photos and the actual pressure logs. A clean PDF summary isn’t enough. You want to see the raw data and any failures, because the failures show you where the system was weak before remediation.
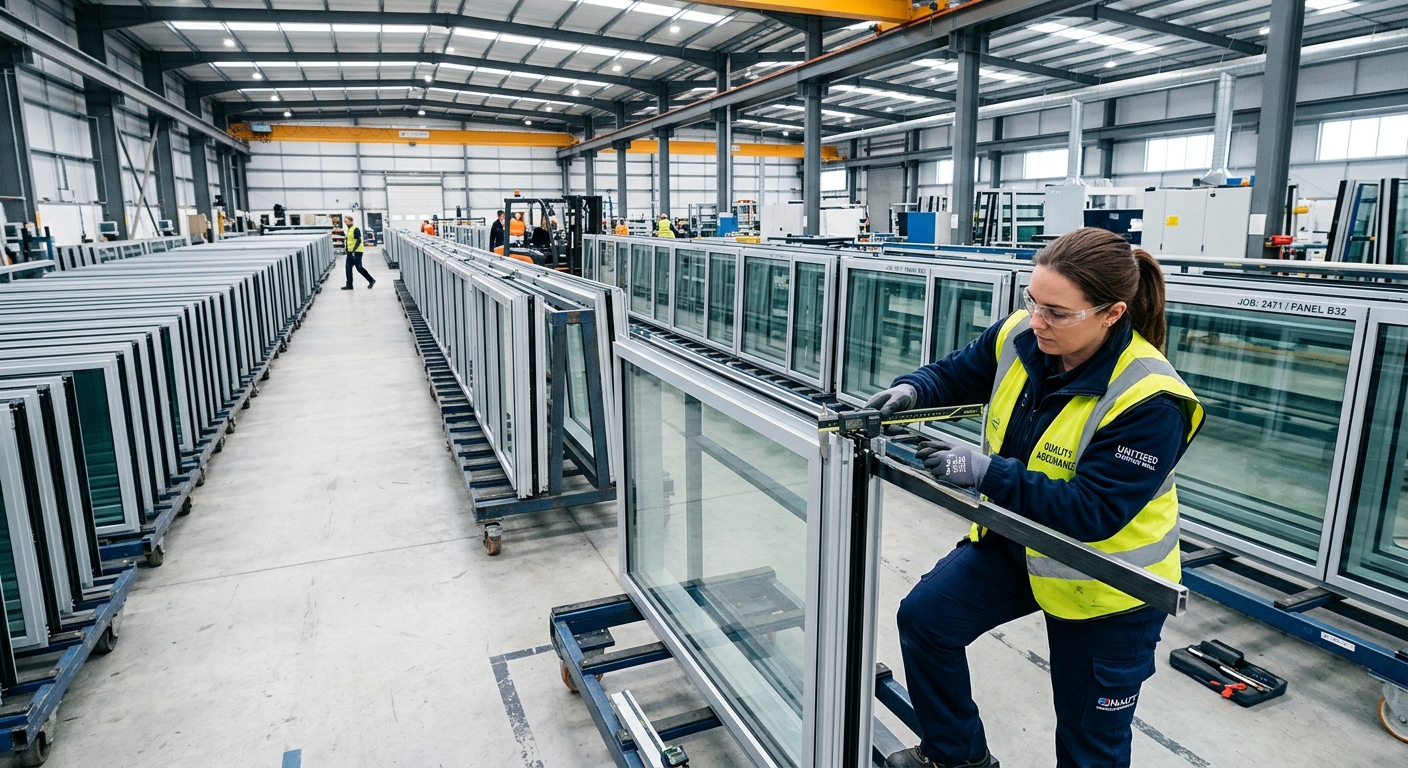
A perfect design can still leak if fabrication tolerances drift. Gasket compression depends on cavity dimensions accurate to ±0.5mm. Anodized profiles with a 0.3mm twist over 4m won’t seat their gaskets uniformly. Mitre joints that gap by even 1mm at the corner become permanent capillary leaks.
This is why scale and process control matter at the factory level. At our 150,000 m² manufacturing facility, every unitized panel runs through a dimensional QC station before glazing, and a sample from each batch goes through a small-scale water test before shipping. Not all suppliers do this — ask yours how many leak-related warranty claims they had last year and what percentage of panels are dimensionally inspected. If they can’t answer with numbers, assume zero.
For a real example: a contractor on a 32-story office tower in Southeast Asia rejected the first batch of unitized panels because random mullion samples showed 1.2mm bow over 3.5m. The supplier blamed shipping. The contractor pulled extrusion records and discovered the die had been running 18,000 meters past its replacement spec. Catching that on panel #40 instead of panel #800 saved the project six weeks.
Even a well-designed, well-fabricated system can leak if it’s installed in the wrong order. The most common site-level mistakes:
A sensible install QA protocol: water-test the first three completed panels on each elevation before continuing. Use a garden hose at low pressure for 15 minutes per joint, and inspect from the interior. It’s primitive, but it catches workmanship issues before they multiply across 2,000 panels.
Before the first panel arrives on site, walk through this list with your facade consultant and the manufacturer:
None of this is exotic. It’s standard practice that gets skipped under schedule pressure. The half-day it takes to run the checklist is the cheapest insurance policy on the entire project.
Curtain wall leaks are a design problem disguised as a workmanship problem. Pressure equalization, thermal movement, gasket continuity, and verified testing — get these four right at the shop drawing stage and the rest of the project gets dramatically easier. Skip them, and no amount of site sealant will save you.
If you’re scoping a new project or troubleshooting a problem facade, our engineering team can review your shop drawings against the failure modes covered here and recommend specific revisions. Explore our curtain wall solutions, browse completed facade projects, or get in touch for a design review. The earlier we look at it, the less it costs to fix.


Arabic

English

Spanish
Fill out the form below and our team will get back to you within 24 hours with a tailored solution.
